Learn CalculiX
←
What is CalculiX?
CalculiX is a free, open-source finite element analysis (FEA) program used for structural, thermal, and fluid simulations. It uses an input file format compatible with Abaqus, making it a powerful tool for engineers who want to run professional-grade simulations without a commercial license.
FEA works by dividing a physical object into thousands of small elements (a mesh), then solving the governing equations across each element to predict how the part behaves under loads — whether that's stress, deformation, heat flow, or vibration.
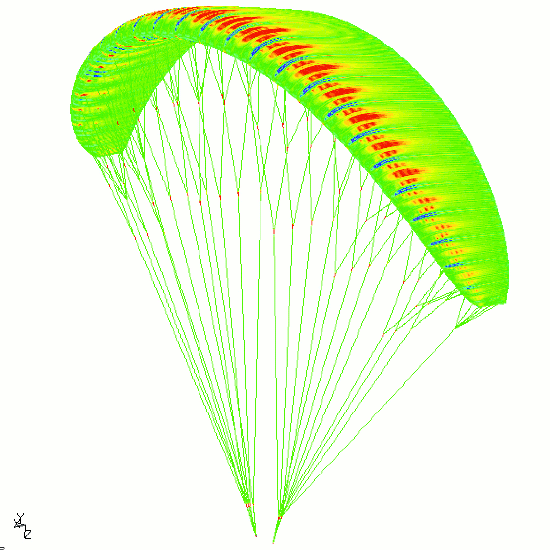
🔩 Structural Analysis
Static and dynamic stress, strain, and deformation under mechanical loads
🌡️ Thermal Analysis
Steady-state and transient heat conduction, convection, and radiation
🔄 Modal Analysis
Natural frequencies and mode shapes for vibration and resonance studies
Installation
CalculiX comes in two programs: ccx (the solver) and cgx (the pre/post-processor).
Linux (Ubuntu/Debian)
sudo apt-get install calculix-ccx calculix-cgxmacOS (Homebrew)
brew install calculixWindows
Download pre-compiled binaries from the CalculiX website or use WSL (Windows Subsystem for Linux) with the Linux instructions above.
The FEA Workflow
Every CalculiX simulation follows three stages:
1. Pre-Processing
- Define geometry and mesh
- Assign material properties
- Apply boundary conditions
- Define loads
2. Solving
- Run
ccx input_file - Solver assembles stiffness matrix
- Linear/nonlinear system solved
- Results written to .frd file
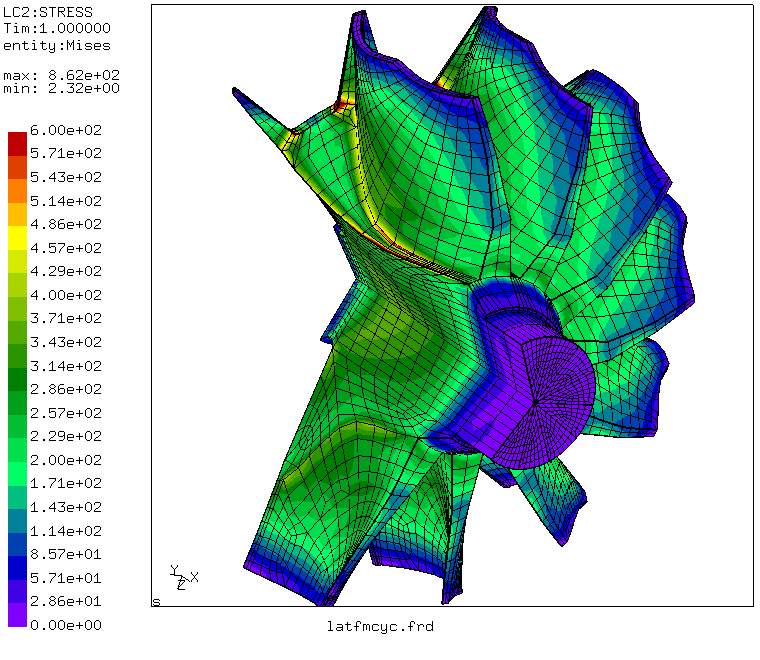
3. Post-Processing
- Open .frd in cgx or ParaView
- View stress/displacement contours
- Check for failure criteria
- Iterate on design
Input File Structure
CalculiX reads .inp files that define every aspect of the simulation using keyword-based blocks. Here is a minimal example for a cantilever beam under a tip load:
** Cantilever Beam - Static Analysis
** Nodes: define X, Y, Z positions
*NODE
1,  0.0, 0.0, 0.0
2,  1.0, 0.0, 0.0
3,  2.0, 0.0, 0.0
...

** Elements: connect nodes into elements
*ELEMENT, TYPE=C3D8, ELSET=BEAM
1, 1, 2, 3, 4, 5, 6, 7, 8
...

** Material: define elastic properties
*MATERIAL, NAME=STEEL
*ELASTIC
210000.0, 0.3    ** E (MPa), Poisson ratio

** Assign material to element set
*SOLID SECTION, ELSET=BEAM, MATERIAL=STEEL

** Boundary condition: fix one end (nodes in set FIXED)
*BOUNDARY
FIXED, 1, 6    ** constrain DOF 1-6

** Step: apply load
*STEP
*STATIC
*CLOAD
TIP_NODE, 2, -1000.0    ** 1000 N in -Y direction
*NODE PRINT, NSET=ALL
U                        ** output displacements
*EL PRINT, ELSET=BEAM
S                        ** output stresses
*END STEP
Key Keywords
*NODE— node coordinates*ELEMENT— element connectivity*MATERIAL— material properties*BOUNDARY— constraints (DOF locks)*CLOAD— concentrated nodal forces*STEP— analysis step block
Common Element Types
C3D8— 8-node hexahedral (brick)C3D10— 10-node tetrahedral (quadratic)S4— 4-node shell elementB31— 2-node beam elementCPS4— 4-node plane stressCAX8— 8-node axisymmetric
Running a Simulation
Once your .inp file is ready, run the solver from the terminal:
# Run the solver (outputs .frd, .dat, .cvg files)
ccx my_model

# Open results in the CalculiX post-processor
cgx my_model.frd

# Or convert to VTK format for ParaView
cgx -b convert.fbd
The solver produces a .frd file containing nodal results and a .dat file with printed output. The .cvg file tracks convergence for nonlinear problems.
Tips for Getting Started
- Start with simple geometry — validate your setup on a beam or plate with a known analytical solution before tackling complex parts.
- Check units — CalculiX has no built-in unit system. Pick one (e.g., N, mm, MPa) and use it consistently throughout the entire model.
- Mesh density matters — use a finer mesh in areas of high stress gradient. Too coarse and results are inaccurate; too fine and solve time explodes.
- Use node sets and element sets — grouping nodes with
*NSETand elements with*ELSETmakes applying loads and boundary conditions far easier. - Read the .dat file — the printed output file often reveals issues (large displacements, negative volumes) before you even open the visualizer.